Pro Acoustic Sound
Gabriele Grasso
The Perfect Sound – A Guide to Acoustic Treatment for Your Studio
Discovering The Perfect Sound in Your Space
Acoustic Treatment of Musical Production Spaces
Designing for The Perfect Sound requires thoughtful consideration of space.
Every element contributes to The Perfect Sound.
Understanding how to achieve The Perfect Sound is essential for any audio professional.
This guide is for anyone ready to explore the complex—but fascinating—world of acoustic treatment for music production environments, whether it’s for recording, mixing, or mastering.
Enjoy the journey—and have fun!
Our goal is to help you capture The Perfect Sound every time.
To create The Perfect Sound, one must understand sound dynamics.

With the right approach, you can create The Perfect Sound in your studio.
Let’s focus on achieving The Perfect Sound through effective treatment.
When designing for The Perfect Sound, consider all aspects of the environment.
Introduction
First of all, we firmly believe that environments have the power to transmit energy and spark inspiration. We all seek that one idea capable of transforming our professional path—and the best intuitions often emerge in spaces that fuel creativity and radiate positive energy.
The Perfect Sound begins with understanding your space.
Designing a space for music production, recording, mixing, and mastering isn’t a vertical or isolated task—it’s a horizontal and cross-disciplinary process.
To do it right, you must draw from a wide range of disciplines: architecture, engineering, lighting, interior design, psychology, proxemics, and—of course—acoustics. Each one plays a crucial role in shaping an environment where ideas can flow freely and sound can be truly heard.

Practical Basics of Acoustics
We could tell you that “sound” is a wave phenomenon—an oscillation that propagates mechanical vibration energy through an elastic medium, like air. But let’s keep it simple: where there’s air, there’s sound.
And as you know, where there’s air, there’s life. So it’s no surprise that our lives are constantly surrounded by sound.
With the right tools, you can achieve The Perfect Sound every time.
No matter the source, sound travels through air (and other media too, but let’s stick with air for now), changing its pressure, velocity, and density as it moves. We hear it because those air vibrations eventually reach our ears.
And that brings us to something essential: take care of your ears. They are your most valuable tool—more than talent, taste, or even those 30 rack units packed with shiny, wonderful gear.
Here’s a key number to remember: 80 dB. That’s the recommended maximum sound level for full-day exposure. You’ve probably heard of decibels (dB), but just in case—it’s the unit used to measure sound intensity. The higher the number, the louder the sound, and the more stimulation (or strain) on your ears.
Embrace the journey towards The Perfect Sound with enthusiasm.
If you go above that threshold, safe exposure time drops sharply. For example:
- At 90 dB, the limit is 8 hours
- At 95 dB, it drops to 4 hours
- At 100 dB, you’re down to just 2 hours
Exceeding these limits can lead to serious and permanent hearing damage over time. Plus, you risk losing an accurate perception of your work—because at high volumes, certain frequencies can seem much more prominent than they actually are.
Discovering The Perfect Sound requires careful planning.
Creating The Perfect Sound isn’t just about the equipment.
You can achieve The Perfect Sound through strategic design choices.
But let’s get back to the journey: how this moving air we call sound finds its way to your ears…
There are two fundamental—and very different—types of environments in which sound propagates through air: the free field and the reverberant field.

The free field is a space where sound travels without encountering any obstacles or reflective surfaces. In other words, it’s acoustically “empty.” Trust me—it’s a pretty boring place. Imagine cranking your Les Paul Custom Shop through an old Plexi and a 4×12 Greenback… and hearing none of the room’s response. No life, no vibe—just raw, isolated sound.
On the other hand, the reverberant field is where things get interesting. In this space, sound waves reflect off surfaces multiple times, creating a rich and complex acoustic environment. This is the character of the room—the personality. A well-optimized reverberant environment can enhance clarity, warmth, and depth, depending on how it’s designed and treated.
Unless your recording studio is somehow floating—perfectly still—in the middle of the sky (which we doubt), you’ve probably figured out that we’re going to focus on the reverberant environment.
Let’s start by understanding how sound moves through air inside a reverberant space, and how it reflects off the surfaces it encounters.
Now, imagine you’ve got 20 bouncy balls. Remember those? Come on—you definitely do. We all played with them as kids. The kind that, once thrown, would bounce all over the place, often breaking something and getting us into trouble.
Why 20? Because the more we have, the better we can visualize the concept—and 20 is more than enough to get the idea.
These 20 balls come in five different sizes:
- 4 large
- 4 medium-large
- 4 medium
- 4 medium-small
- 4 small
Now here’s the trick: swap the word “large” with low frequencies and “small” with high frequencies—and you’re already starting to see where this is going.
Every detail is essential for achieving The Perfect Sound in your environment.
Next, choose a room in your house. Empty it out—remove all the furniture, lamps, and decorations. Make it a bare, echoey box.
Now take those 20 balls, stand in one corner, and throw them all at once with as much force as you can. Each one will shoot off in a direction based on your throw, and when they hit a surface—floor, ceiling, or wall—they’ll bounce, change direction, and keep going. Over time, the smaller balls (higher frequencies) will slow down and stop before the larger ones (lower frequencies), which will keep bouncing longer.
What you’ve just seen is essentially what happens—on a much faster scale—when your speakers emit sound. Those bouncing balls represent sound impulses divided by frequency, ricocheting around the room.
Now, if you’re feeling brave (and a little reckless), grab a friend. Stand in the center of the room while your friend throws hundreds of balls at you from all directions. You’ll feel some hit you, others miss, and a few collide with each other and drop before reaching you. This is exactly what happens to sound in an untreated room—some frequencies make it to your ears clearly, others arrive late or not at all. And that’s a problem.
This chaotic bouncing behavior is precisely what we don’t want.
To be clear, having too much disorder is just as problematic as having none at all. The key is to find the right balance between reflection and control—between energy and clarity.
Of course, there are moments when all this chaos and reflection actually sounds beautiful. In fact, it can make our music feel richer, deeper, and more alive. We’re talking about a phenomenon called reverb—which, for most of us, is more than just a natural occurrence… it’s an effect we love and use all the time.
Let’s introduce a fundamental concept: reverb.
By definition, reverberation time (often referred to as RT60) is the time it takes for sound to decay by 60 dB after the sound source stops.
If we take an average-sized room—around 20 m² with a ceiling height of 2.7 meters—the optimal reverb time we recommend is between 0.2 and 0.4 seconds, measured in the frequency range between 200 Hz and 4000 Hz.
If you’re familiar with reverb plugins, you’ll recognize that this is a very short decay time. But in the context of a mixing or recording room, that brevity is essential for clarity and accuracy.
Our goal is to design a space for music production, recording, mixing, and mastering where sound diffusion is as balanced and controlled as possible.
To achieve that, we need to introduce a second important concept: standing waves.
The Perfect Sound is not a destination but a journey of continuous improvement.
Remember those bouncy balls from earlier? Some collided mid-air and lost their momentum before reaching you. Well, standing waves behave in a similar way—though in a more complex and less visible form.
In acoustics, standing waves occur when two sound waves of equal frequency and amplitude meet while traveling in opposite directions, often due to reflection off surfaces like walls or ceilings.
This interaction can lead to two outcomes:
- Cancellation – where certain frequencies drop out or disappear entirely
- Reinforcement – where other frequencies get amplified, creating resonance
This means that some notes may sound overpowering, while others seem weak or missing—a nightmare for anyone trying to mix or record accurately. Even worse, you might get harmonic distortion caused by waves that get “stuck” in space instead of dispersing naturally. These anomalies introduce imbalance, and as we said earlier, imbalance is what we want to avoid.
Our aim is simple:
We want all the sound waves produced by our speakers to reach us in the cleanest, most balanced way possible, without getting lost, trapped, or exaggerated along the way.
In the next chapters, we’ll explore how to:
- Set the right reverberation time for your space
- Control the way sound waves travel in both space and time
- Optimize the acoustic energy inside your room
One final note:
Sound doesn’t just move through air—it travels through solids too.
We perceive this in the form of vibrations, which are important but not the focus here.
That’s because acoustic treatment is not the same thing as soundproofing.
Of course, to ensure accurate listening, it would be ideal to eliminate external noise as well—but for now, we’re assuming your space is isolated enough to focus solely on what happens inside.
By focusing on The Perfect Sound, you contribute to your legacy as a creator.
Let’s take the next steps to achieve The Perfect Sound together.

Introduction to Acoustic Treatment
The Importance of Treatment
Why Is Acoustic Treatment So Important?
The first and most straightforward reason is this:
To ensure that what you hear is truly what your speakers are producing.
If your room colors or distorts the sound, every decision you make—whether you’re recording, mixing, or mastering—will be based on a false premise. And in music production, accuracy is everything.
The Perfect Sound is within your reach with the right techniques.
Find inspiration in The Perfect Sound around you.
Every project is an opportunity to refine The Perfect Sound.
Let’s dive deeper into achieving The Perfect Sound.
When you focus on The Perfect Sound, everything else falls into place.
The second reason, which is just as important to us, is more personal:
Acoustic treatment is an opportunity.
It’s your chance to shape an environment that not only sounds great but also feels great—a space that inspires you, reflects your unique style, and supports your creative process. After all, this is where you’ll be making art—and art, at its core, is about expressing emotion.
At ProAcousticSound, our goal isn’t to sell you a generic, one-size-fits-all acoustic panel and tell you “this will do.”
Instead, we want to inspire you to build a space that is truly yours—designed specifically around the geometry of your room, the layout of your furniture and equipment, and most importantly, your personality as a creator.
That said, this ebook is also here to equip you with a solid foundation of technical knowledge, so you can confidently begin making informed decisions and, if you wish, proceed independently in the best possible way.
Choosing the best environment
Most of us don’t have the luxury of choosing the perfect room—or better yet, building one from scratch—to use as a music production space.
But if you are among the lucky few who do, the best and most honest advice we can give is this:
consult with professionals. Whether that’s us or someone else you trust, don’t miss the chance to do things right from the very beginning.
Why?
Because creating a space that performs well acoustically is a major opportunity—and it’s not a cheap one. Mistakes at this stage can be very costly and, unfortunately, there’s no “Command Z” once construction has started.
Another crucial step: always check the legal and zoning regulations related to the space, both for its current intended use and for any future permissions that might be required.
Not all buildings—or even specific parts of a building—are allowed to host a recording studio. A professional urban planning feasibility check can save you a lot of time, money, and frustration down the line.
That said, if you’re eager to start wrapping your head around the process, here are the key factors we believe are fundamental to begin designing a proper acoustic environment:
In acoustics, the BOLT Area Diagram—often simply called the BOLT Diagram—is a valuable tool used to evaluate the acoustic characteristics of a rectangular room, particularly in relation to modal behavior and sound wave propagation.
Rather than showing how individual sound waves reflect or absorb in a space, the BOLT diagram is used to analyze the proportions between the room’s three dimensions: length, width, and height. It helps identify optimal dimensional ratios that promote a more uniform distribution of modal frequencies—those low-frequency resonances that can otherwise cause certain notes to be too strong or too weak.
The area highlighted in the diagram—known as the BOLT Area—includes the room proportion combinations that are generally considered acoustically favorable. Rooms whose dimensions fall within this zone tend to avoid problematic modal overlaps, reducing the risk of acoustic issues like standing waves, boomy low end, or uneven bass response.
In short, the BOLT diagram is a practical reference for anyone designing or evaluating a studio or critical listening environment, ensuring that the room’s proportions set a solid foundation for good acoustics—even before any treatment is applied.
There are several excellent online tools that can help you begin to evaluate the ideal proportion ratios for your room.
One we highly recommend is Amroc, a free and powerful acoustic calculator.
By simply entering the dimensions of your rectangular room, the tool will instantly show you whether your room’s proportions fall within the BOLT Area.
To put it simply:
- Inside the BOLT Area = Good
- Outside the BOLT Area = Potential Acoustic Problems
But that’s not all—Amroc also allows you to analyze your room using the Bonello Criterion, another useful method that evaluates the distribution of room modes (resonant frequencies) to check whether the room is likely to produce an even acoustic response.
These tools are a great way to start understanding the acoustic potential of your space before beginning any treatment or construction work.
The Bonello Criterion
Understanding the Bonello Criterion
The Bonello Criterion is a method used to evaluate the quality of modal distribution within a room. It does this through a graphical representation that shows the number of modal frequencies falling within each one-third octave band, plotted against the central frequency of those bands.
In simple terms, this graph helps us understand how evenly the room’s modes are spaced across the frequency spectrum.
According to the Bonello Criterion, in order to avoid acoustic problems, any mode—whether axial, tangential, or oblique—should be spaced by at least 5% of its frequency from the next adjacent mode.
For example:
- A mode at 40 Hz should have at least a ±2 Hz gap (5% of 40 Hz) between the next lower and higher mode.
- If two or more modes are too close together, they can overlap and cause unwanted resonances or nulls, making certain frequencies too strong or too weak.
How to Read the Graph
When you use a tool like Amroc to generate a Bonello graph:
- If the graph rises steadily without dips, this is a good sign. It means the modal distribution is smooth and predictable—your room has favorable geometric proportions.
- If the graph shows dips, plateaus, or inconsistencies, it indicates gaps or clustering in modal frequencies—your room has problematic proportions, and acoustic treatment will be more complex and expensive.

In the diagram above, the graph shows continuous upward growth, representing a room with positive geometric proportions.
In contrast, the diagram below shows climbs and drops, indicating a room with unbalanced modal distribution and negative proportions.
The Schroeder Frequency
The Schroeder frequency marks the transition point between two ways of describing sound behavior in a room:
- Below this frequency, sound behaves in terms of discrete resonant modes—each frequency has its own behavior and must be treated accordingly.
- Above this frequency, sound behaves more statistically, forming what’s known as a diffuse field, where individual modes blend together and can be described using statistical models.
Because of this, the Schroeder frequency is often referred to as the limit frequency:
It tells us where modal problems end and diffuse, more manageable behavior begins.
As we mentioned earlier, one of our key goals in room design is to strike the right balance between order and disorder, aiming to avoid any areas of stagnant or uneven energy. The Schroeder frequency helps us determine how low into the frequency spectrum this more “balanced” behavior starts.
In general: the lower the Schroeder frequency, the better—because it means a larger portion of the frequency range behaves in a more predictable and uniform way.

Examples
Let’s take a look at two different room setups:
✅ Room A
- Dimensions: 700 cm x 500 cm x 330 cm
- BOLT Area: ✅ Inside
- Bonello Graph: ✅ Smooth, upward trend
- Schroeder Frequency: ✅ 144 Hz
This is a great result. We’re inside the BOLT Area, the Bonello criterion shows a well-distributed mode pattern, and the Schroeder frequency is relatively low.
In short: this room has excellent potential for acoustic treatment.
❌ Room B
- Dimensions: 300 cm x 300 cm x 270 cm
- BOLT Area: ❌ Outside
- Bonello Graph: ❌ Irregular with gaps
- Schroeder Frequency: ❌ Much higher
In this case, the small and symmetrical dimensions create acoustic challenges. The room doesn’t fall within the optimal BOLT Area, and the modal distribution (as seen in the Bonello graph) shows irregularities. The higher Schroeder frequency tells us that fewer frequencies behave statistically, so more frequencies need individual treatment.
In the BOLT area, the Bonello diagram does not rise consistently with the correct proportions. However, an even more challenging issue is the Schroeder frequency, which occurs at 314 Hz.
Now that we’ve explored the ideal proportions of a finished listening room, as suggested by the literature, it’s important to remember that these dimensions must account for acoustic treatment. To return to the target finished dimensions after treatment, additional space is required in the raw (or “rustic”) construction phase.
As a baseline, we can consider adding approximately 50 cm to both the width and the length of the room. However, the height requires more careful consideration. The optimal finished height—from the floor to the underside (intrados) of the first acoustic surface above the listening position—should fall between 300 cm and 340 cm.
To achieve this finished height, we must account for screeds, raised floors, false ceilings for electrical and HVAC systems, and the acoustic treatment itself. Realistically, this means starting from a raw ceiling height of at least 400 cm. If a mechanical air treatment system (for heating, cooling, and air filtration) is to be integrated, the initial height should be no less than 500 cm.
This additional volume allocated for acoustic treatment serves multiple purposes, with one of the most critical being the adjustment of the reverberation time. Assuming we begin with a reverberation time of approximately 0.6 seconds, typical of untreated civil spaces, and use the example dimensions of 500 cm x 700 cm with a finished height of 330 cm, we calculate a Schroeder frequency of approximately 144 Hz.
After applying sound-absorbing treatment to our environment, we’ve effectively reduced the reverberation time. If we imagine having brought it down to 0.3 seconds, the Schroeder frequency would drop to approximately 102 Hz—and this is without any specific low-frequency treatment. If we push the reverberation time further to 0.2 seconds, the Schroeder frequency can decrease to around 83 Hz.
However, caution is essential: over-damping a room can make the sound feel lifeless. Always aim for a balance and harmony between acoustic control and natural liveliness—a state between disorder and quiet.
We’ve seen how selecting optimal proportions for height, width, and depth allows for a significantly lighter and more efficient acoustic intervention. That’s because, with good ratios, the energy of reflected sound (our metaphorical “bouncing balls”) is already well-distributed throughout the space.
With the tools and insights outlined above, you now have the foundation to begin evaluating the most acoustically favorable dimensions for your room, in relation to your space constraints and audio setup.
If you’re working with an existing room and the tool outputs poor results after entering your dimensions—don’t despair. There’s always a plan B.
A positive result simply means the required acoustic treatment will be lighter and easier. A negative result means more extensive treatment and correction will be necessary—but rest assured, in most cases, a well-balanced acoustic environment can still be achieved.
Final Note on Room Geometry and Construction Materials
As a final consideration regarding the geometric relationships of the room, it’s worth emphasizing that non-parallel surfaces remain an excellent choice for minimizing standing waves and flutter echoes. However, be cautious with symmetry—while symmetry can help achieve even dispersion, perfectly symmetrical but flawed constructions may cause more severe acoustic issues than the absence of symmetry itself.

Construction Materials and Their Impact
All the evaluations and recommendations provided are based on typical residential construction materials, including:
- Perforated or solid brick boards
- Poroton or Gasbeton blocks
- Double-layer plasterboard walls filled with high-density rock wool (70 kg/m³)
- Load-bearing reinforced concrete walls
Any other types of vertical partitions—especially lightweight or low-mass systems—must be evaluated on a case-by-case basis. For example, a simple plasterboard wall with only one sheet per side and no insulation may resonate or “ring,” invalidating the assumptions made by our acoustic modeling tools.
Ceilings and Floors
When referring to ceilings and floors, we assume:
- Ceilings: Solid brick-cement or reinforced concrete slabs
- Floors: Brick-cement slabs with lightweight screed topping
We initially promised to focus solely on airborne sound propagation, but if you’re building your room from scratch, it’s essential to consider structure-borne transmission—in short: vibration.
Just as Native Americans once placed their ears on train tracks to hear distant trains, vibrations through solids carry information efficiently and can compromise your acoustic goals. Our quick but vital advice: prioritize surface decoupling.
This topic is complex, but its importance cannot be overstated. The gold standard for isolation is the Box-in-a-Box construction method.
If you’re interested in exploring this approach in a tailored acoustic design, feel free to contact us at:
📧 proacousticsound@gmail.com
Choosing the listening position
Practical Guidelines for Setting Up Your Listening Room
Whether you’re designing a studio from scratch or working with an existing room, the following key principles are always applicable.
✅ Symmetry is Essential
In domestic-sized environments—typically ranging from 20 to 50 square meters—symmetry is critical. These relatively small spaces must be arranged based on symmetrical principles, especially in terms of left-right balance around the listening position.
Larger, open-plan rooms—like those used for hybrid roles (e.g., combined control and recording spaces)—can break symmetry more freely. But that’s a different, more advanced type of project.
🎯 Orientation and Listening Axis
Ultimately, The Perfect Sound connects your vision to the audience.
For most home or project studios, we’re working with small to medium-sized rectangular rooms. In these cases, it’s best to orient the listening axis along the room’s longest dimension. That is, you’ll divide the room lengthwise, placing your listening position facing the shorter wall.
Don’t worry too much about obstacles like doors or windows—with proper treatment, they can always be made acoustically irrelevant.
📏 The 38% Rule
Once your orientation is set, the next key question is:
How far should the listening position be from the front (shorter) wall?
A widely accepted guideline from acoustic literature recommends placing the listening position at 38% of the room’s length from the front wall. While not an absolute rule, it’s a proven starting point for achieving a balanced frequency response.
✅ Tip: Avoid sitting exactly in the center of the room! That’s where many low-frequency issues tend to accumulate.
By positioning yourself within this 38% zone, you’ll avoid problematic bass nulls and peaks that typically occur at the room’s center or boundaries.
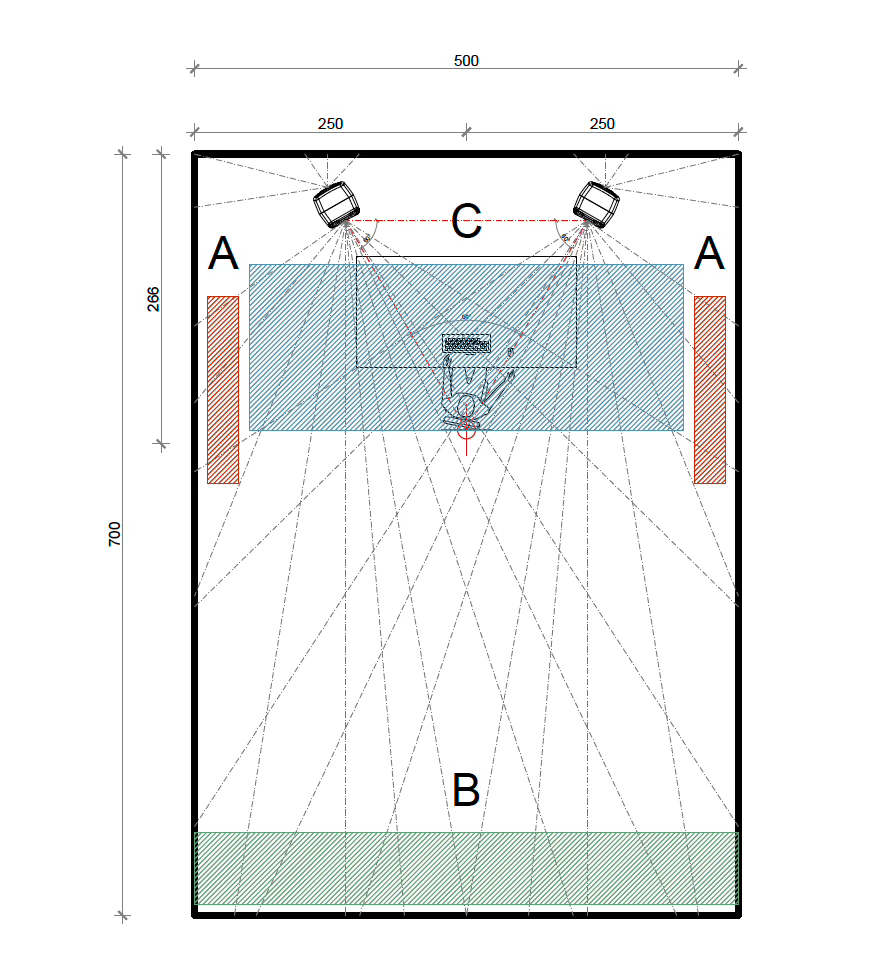
📌 If these proportions are still unclear, refer to the diagram below for a visual explanation—it should make everything easier to grasp.

Visual Reference and Key Listening Setup Guidelines
As shown in the diagram, the optimal listening position is symmetrically placed with respect to the short side of the room—250 cm from each side wall—and 266 cm from the front wall, which is exactly 38% of the room’s length:
📐 700 cm × 0.38 = 266 cm
A room with dimensions of 700 cm (length) × 500 cm (width) × 330 cm (height) offers excellent acoustic potential and is truly a space built for pure listening enjoyment.
Let us reiterate:
While the 38% rule is not a strict scientific formula, it is a reliable and well-supported starting point for determining the ideal listening position. It can and should be adapted based on your room size and the type of speaker system in use.
Speaker Height: A Non-Negotiable Rule
When setting up a 2.0 or 2.1 listening system (two speakers, with or without a subwoofer), the height rule is simple and essential:
🎧 The tweeter (or the acoustic center of the speaker) must be at the same height as the center of your ears when you are seated at the listening position.
- On average, this height is around 125 cm.
- However, your personal height matters—if you’re 210 cm or 160 cm tall, measure the distance from the floor to your ears while seated, and align the tweeter to that height.
For optimal flexibility and accuracy, it’s strongly recommended to use height-adjustable speaker stands, or to build custom stands matched to your setup.
💡 Adjustable stands are a great long-term investment, as they allow you to swap speakers without needing to replace the stands.
Stereo Image and Speaker Angle: The 60° Rule
The ideal stereo image is highly dependent on what’s placed between you and the speakers, but the classic 60-degree angle is a consistent and trusted reference.
Start with this equilateral triangle setup:
- The distance between the two speakers should equal the distance from each speaker to your ears.
- This naturally forms a 60° angle at the listening position.
Fine-tune from there based on your preferences and room characteristics. Minor variations of a few degrees are normal and usually harmless, but angles that are too wide or too narrow can seriously compromise stereo imaging and localization.

Final Considerations: Practicality, Flexibility & Enjoyment
The most observant among you may have noticed an interesting alignment:
- The listening position at 266 cm is exactly 38% of the room length (700 cm × 0.38 = 266 cm).
- Similarly, the ideal ear height of 125 cm represents 38% of the room height (330 cm × 0.38 = 125 cm).
These are valuable reference points—but they’re not rigid laws.
🔺 The Listening Triangle Must Stay Intact
The two speakers and the listening position form an equilateral triangle, and this triangle needs to move as a unit. That means if you change the speaker positions significantly, you’ll need to adjust your listening spot accordingly. They’re all interconnected.
If you’re working in an untreated room, a simple but very effective tip is to place your speakers as close as possible to the front wall (without touching it). This helps minimize destructive reflections and boundary interference. Again, don’t obsess over every centimeter—these measurements are guides, not rigid rules.
🎵 The Most Important Rule? Enjoy the Music
Every room has its own unique geometry, quirks, and constraints. Your speaker size, your height, and your workflow habits all influence how best to apply these principles.
And remember—no one’s making music with a broom in hand, sweeping around for perfect symmetry. The goal isn’t perfection, but comfort, creativity, and joy.
So find a setup that makes you feel good. Stay mindful of the basics, but don’t get lost in the numbers. Think about the music—and enjoy the process whether you’re producing, recording, mixing, or mastering.

🎯 Areas of Intervention: Where to Focus Acoustic Treatment
One of the most common questions in room acoustics is:
“Where should I intervene to properly correct the sound?”
The most accurate answer is: it depends on the specific project.
However, there are universal principles that apply to virtually all listening environments—especially in home and project studios.
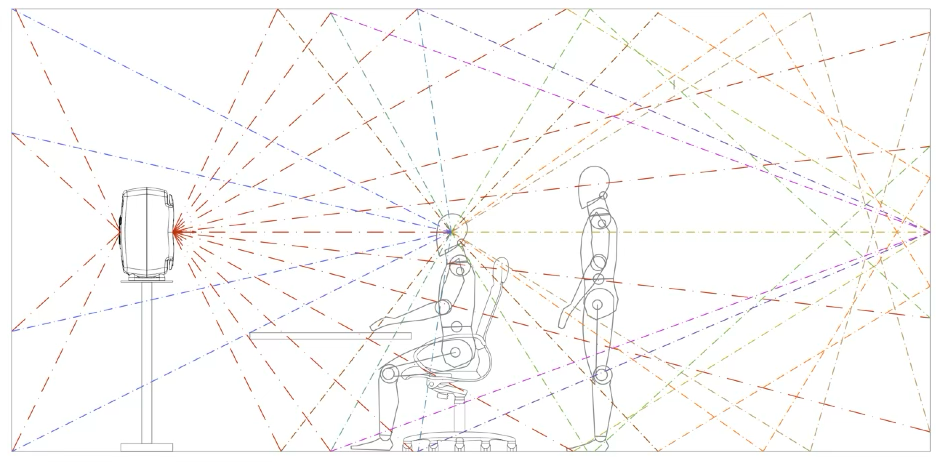
🧱 No Surface Should Be Neglected
Ideally, every surface in a room can contribute to how sound behaves. But if we have to prioritize, we focus first on the surfaces that directly affect what reaches your ears most critically.
These are, in order of importance:
- Your ears (A) – The side wall reflections and early reflection points.
- Your nape (B) – The rear wall behind your listening position.
- Your skull (C) – The ceiling directly above your head and listening area.
🎧 These three zones directly impact the clarity, stereo image, and spatial perception of your sound.
Neglecting them will compromise all the rest of your treatment.
Start with these areas as your foundation for acoustic correction. Treat them with absorptive materials and/or diffusive elements depending on the needs of your space.
📊 In the diagram below, you’ll see these critical areas clearly labeled:
- (A) Ears – Lateral early reflections
- (B) Nape – Rear wall reflections
- (C) Skull – Overhead reflections
🛠️ Acoustic Treatment: What to Do in Each Zone
Now that we’ve identified the three primary zones—A (ears), B (nape), and C (skull)—let’s look at what kind of treatment each area requires.
🎧 Zone A: Side Reflections (Ears)
- Focus: Very high, high, and mid-high frequencies
- Treatment: Use high-performance absorbers or hybrid panels to tame early reflections.
This improves clarity and stereo imaging, helping your ears receive a more accurate signal.
🧱 Zone C: Ceiling (Skull)
- Focus: High, mid-high, mid-low, and low frequencies
- Treatment: Install broadband absorption panels, ideally with air gaps or bass traps if possible.
This prevents damaging vertical reflections and helps control room modes from above.
🔄 Zone B: Rear Wall (Nape)
- Focus: Mid-high, mid-low, and low frequencies
- Treatment: A combination of absorption and diffusion is ideal.
You want to absorb energy to prevent reflections from bouncing back to your ears, and scatter the remaining sound to avoid direct “slapback” reflections.
🎾 Remember the “bouncing balls” metaphor from earlier? Zone B is exactly where those rogue reflections tend to collide. Refer back to the diagram on page 9 if needed.
🔍 Step Two: Secondary but Critical Interventions
Once Zones A, B, and C are under control, it’s time to address real modal trouble spots—the corners.
📌 Corner Treatment: Don’t Overlook Any of Them
- It’s not just the vertical corners behind or in front of your speakers.
- All corners matter:
- Vertical (wall-to-wall)
- Wall-to-ceiling
- Wall-to-floor (where accessible)
These are common areas where low-frequency energy builds up, creating standing waves and bass problems. Installing bass traps or deep absorbers in these areas helps flatten the room response and reduce muddiness.
🛋️ Bonus Tip: What About the Sofa?
If you’re wondering whether a sofa can help with acoustic treatment—
✅ The answer is a resounding yes.
A well-placed fabric sofa acts as a broadband absorber, particularly useful for low to mid frequencies. It’s a functional and often underappreciated tool for smoothing room response—especially behind your listening position.

🎱 Final Notes on Full-Height Treatment & Real-World Acoustics
All the surfaces we’ve discussed so far—Zones A, B, C, and the corners—must be treated across the full height of the wall.
Why? Because sound bounces like billiard balls.
When you break the rack in a game of pool, the balls scatter in all directions. Sound behaves the same way—it reflects off every available surface unless you stop it or control it.
🌀 Treat the Remaining Surfaces with Purpose
Once the critical zones are addressed, the remaining surfaces should be treated using a calculated mix of:
- Absorption – to control energy and reverberation
- Diffusion – to scatter sound evenly and avoid dead zones
- Resonance control – to manage low-frequency buildup
🎨 A quick word of caution:
Don’t base your treatment on how things look in photos online.
Many rooms on social media or in magazines showcase decorative panels arranged like colorful tiles—but in world-class studios, treatment is never random or purely aesthetic. It’s purposeful and strategically placed.
📐 Guidelines for Starting Thicknesses
To give you a concrete reference as you begin your acoustic journey, here are suggested treatment thicknesses:
- Zone A (side reflections): 10–20 cm
- Zone B (rear wall): 30–60 cm
- Zone D (corners / modal points): Aim for a radius coverage of about 60 cm
If you build your setup with these dimensions in mind, you’re on a solid path.
🧰 Final Touches: Digital Correction & Real-Life Elements
If you’ve treated your room thoroughly—both in design and execution—it’s time to consider digital acoustic correction. Tools like room calibration software or correction hardware (e.g., DSPs) can fine-tune your results by addressing small frequency imbalances or phase issues that physical treatment may not fully eliminate.
Lastly, remember: your room won’t be empty.
It will have:
- Furnishings
- Instruments
- Curtains and rugs
- Decor
- And of course—people!
All of these elements will influence the acoustic response. That’s normal, and it’s part of why we recommend starting with foundational treatments before getting too deep into details.
🎚️ Digital Measurement & Correction
As we’ve already mentioned, don’t wait until the end to evaluate your acoustic treatment—measure as you go.
You might be surprised to discover that you only need to treat half the surface you originally planned. That’s why it’s essential to check your room’s performance at each step of the process.
📏 What You Need to Measure Your Room
We recommend using the free and powerful software REW (Room EQ Wizard). It allows you to:
- Measure frequency response and reverb times
- Identify room modes and problem areas
- Track progress as you apply treatment
✅ What you’ll need:
- A measurement microphone (such as the UMIK-1 or equivalent)
- Your usual audio interface
- Your existing speakers/monitors
That’s it—you can use the gear you already have for your studio work.
📥 Download REW here:
👉 https://www.roomeqwizard.com/

🎛️ Final Thoughts: Trust Technology, Then Trust Your Ears
Once you’ve treated your room and verified the results using REW, don’t forget the final step: fine-tuning with a modern acoustic correction system.
Today’s correction tools are incredibly powerful and can make a big difference in refining the sound of your space. One standout option is ARC Studio by IK Multimedia—a reliable, professional-grade solution that can help you dial in the final details of your listening environment.
🎧 Trust me—you’ll be amazed by how much clarity and precision it adds to your mixes.
🚀 You’re Ready to Create
Now, all that’s left to do is roll up your sleeves and start working inside your new, optimized, and inspiring music production space—
Whether you’re recording, mixing, mastering, or simply listening for pleasure, you’ve laid the right foundations.
Enjoy the process, make great music, and don’t forget: the room is your first instrument.
🎬 Conclusions
Designing a space for music production, recording, mixing, or mastering is—like music itself—a deeply creative process. In fact, we believe that Music and Architecture are one and the same.
Both begin from a place of education and inspiration. We draw from our experiences, our cultural backgrounds, our references, and key influences. We study the habits of people, define a target audience—the listener or the end user—and, of course, we respect a budget.
Just like composing a song, designing a studio follows a path:
- A creative idea
- Technical foundations
- A defined goal
- A framework of available resources
- And ultimately, expression with intention
We strongly believe that creativity doesn’t depend on big budgets. Take Andy Warhol’s Factory for example—he turned a raw industrial space into the iconic Silver Factory with just tin foil and silver paint. Sure, we’re not recommending foil for your studio’s acoustics—but it shows that vision and bold choices can turn any space into something unforgettable.
🎵 Your Room Is an Instrument
If you work in music, you’re already well-equipped for this journey. Think of your studio as another instrument—like your acoustic guitar or your drums. When your room sounds good, your music will sound better. It’s that simple.
This eBook may only be a first step, but we hope it’s helped you:
- Understand your space
- Make informed decisions
- Feel empowered to create something uniquely yours
✨ Now go create.
Have fun, experiment, take your time—and enjoy every moment of shaping a space that reflects your music, your vision, and your energy.
Let the room inspire the sound, and let the sound inspire the music.
🎧 The DESIGN Program
Tailor-Made Studio Design, From Concept to Creation
Welcome to the DESIGN Program—your complete solution for creating a professional, inspiring, and acoustically optimized music production space. Whether you’re building a home studio or a world-class recording room, our custom design services cover every detail.
We offer six levels of expert design, all fully customizable to match your creative vision, technical needs, and budget.
1. Acoustic Furniture
Functional meets beautiful.
We design and build custom acoustic treatment systems for walls, ceilings, and floors. Each element is handcrafted to fit your space with no limits on size, material, or finish. Control your sound—without compromising style.
2. Design Furniture
Built for your workflow.
From studio desks and workstations to control surfaces and monitor stands, we create technical furniture that supports how you work. Every piece is fully customizable for perfect integration into your setup.
3. Interior Design
Your studio, your vibe.
We take care of every non-technical design element—flooring, wall coverings, lighting, furniture, and decorative finishes. It’s all designed to match your aesthetic, elevate your creativity, and complete the space.
4. Silence
Block the noise. Keep the sound.
We engineer smart, effective solutions to reduce sound transmission to the outside world. Whether you’re in an apartment or a commercial facility, we’ll help you maintain peace without sacrificing performance.
5. Studio Gear
Get the right tools for your sound.
Together, we’ll choose the best monitors, interfaces, microphones, and more—based on your music, your needs, and your existing setup. Every piece of gear will be selected and integrated with care.
6. Live Room
Perfect sound, wherever you record.
We design custom acoustic treatment for your recording rooms, vocal booths, amp boxes, and live rehearsal spaces—ensuring clear, accurate sound capture in every environment.
Start Building Your Dream Studio
Whether you’re just starting out or looking to upgrade, the DESIGN Program gives you access to industry-level expertise, aesthetic vision, and technical precision.
🎯 Fully customized
🛠️ No creative limits
🎵 Designed for how you create
Let’s design a space that works for your sound—and inspires your best work.
👉 Contact us at proacousticsound@gmail.com to get started.
Enjoy the process of discovering The Perfect Sound within your workspace.
The Perfect Sound is achievable by blending technology and creativity.